Outbound Email Configuration
Last updated: 3 minutes read.
Custom Email Templates
The email templates for the Portal and system messages are located in the portal/email_templates directory.
The Tyk Dashboard will need to be restarted for changes to take effect.
Supported email drivers
- SMTP
- Mandrill
- Sendgrid
- Mailgun
- AmazonSES
To get email set up for your installation, add the following to your tyk_analytics.conf file:
"email_backend": {
  "enable_email_notifications": true,
  "code": "{PROVIDER-NAME}",
  "settings": {
    // Client provider specific settings go here. You can find the specific field described below
  },
  "default_from_email": "[email protected]",
  "default_from_name": "Jeffrey (The Dude) Lebowski"
}
SMTP
Available from Tyk Dashboard version 1.7
"code": "smtp",
"settings": {
  "SMTPUsername": "[email protected]",
  "SMTPPassword": "examplepassword",
  "SMTPAddress": "smtp.example.com:587",
  "TLSInsecureSkipVerify": "false"
},
SMTP NoAuth
Available from Tyk Dashboard version 1.8
If SMTPUsername or SMTPPassword is omitted, Tyk assumes that authentication is not required for your SMTP server. When starting up and initialising the email driver, the Dashboard should output a log message as follows:
[May  6 13:46:41]  INFO email: initializing SMTP email driver
[May  6 13:46:41]  INFO email: SMTPUsername and/or SMTPPassword not set - smtp driver configured for no-auth
[May  6 13:46:41]  INFO email: SMTP email driver initialized
Mandrill
"code": "mandrill",
"settings": {
  "ClientKey": "xxxxxxxxx"
},
Sendgrid
"code": "sendgrid",
"settings": {
  "ClientKey": "xxxxxxxxx"
},
Mailgun
"code": "mailgun",
"settings": {
  "Domain": "KEY",
  "PrivateKey": "KEY",
  "PublicKey": "KEY"
},
Amazon SES
"code": "amazonses",
"settings": {
  "Endpoint": "Endpoint",
  "AccessKeyId": "Access-key",
  "SecretAccessKey": "KEY"
},
Customise your Welcome Emails
You can customise the welcome email that a developer recieves when they signup to your portal. You can use images and other HTML formatted content. The following video walks you through the process.
- Select Settings from your Dashboard > Portal Management
- You can change the from email address and the from email name for your welcome emails.
- To use customised email content, select Enable custom welcome email.
- You can then add the following custom content:
- Email Subject
- Email Body content
- Welcome email body copy
- Welcome email sign-off
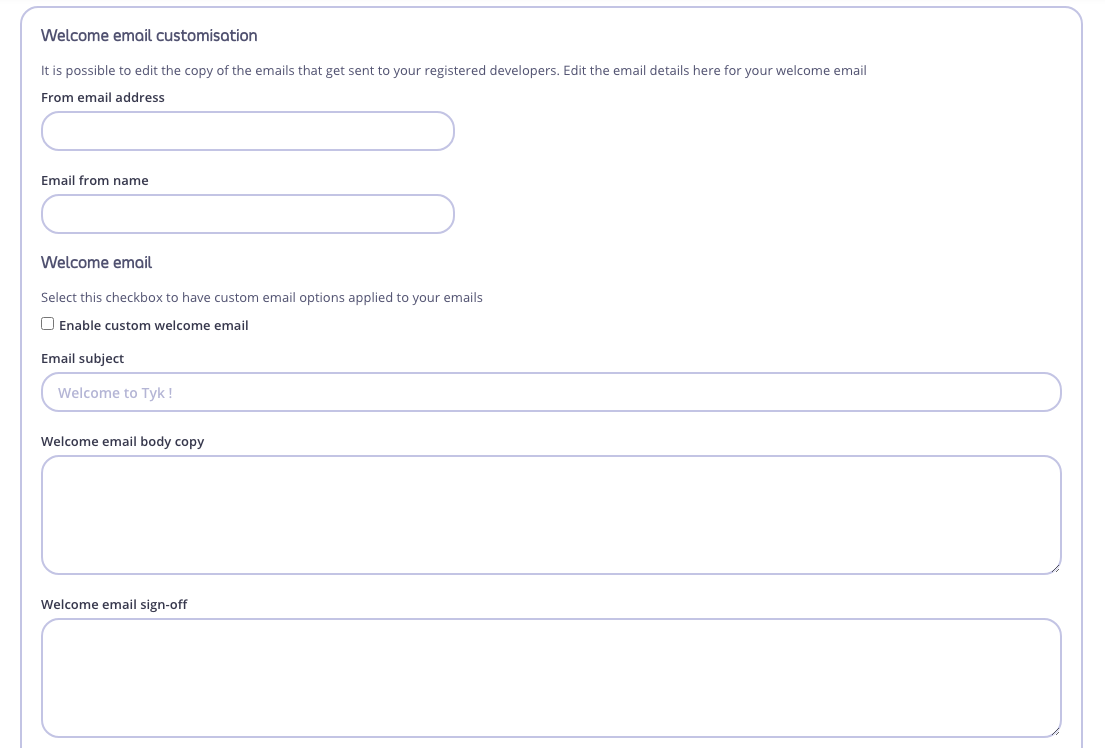
- Enter your plain text or HTML formatted content. If including an image, the
LINK TO IMAGEin an image<img src="[LINK TO IMAGE]"/>link must be a publicly hosted resource. - Click Save at the top of the Portal Settings screen.
Customise your Key Approval Emails
Editing the Email Body
- Select Settings from your Dashboard > Portal Management
- From the “API Key approval email” section, select “Enable custom approval email”, and edit the API Key email body.

Add an image or logo to the Key Approval Email
- Select “Enable custom approval email” as above.
- In the “API Key email body copy” field, enter
<img src="[LINK TO IMAGE]"/>
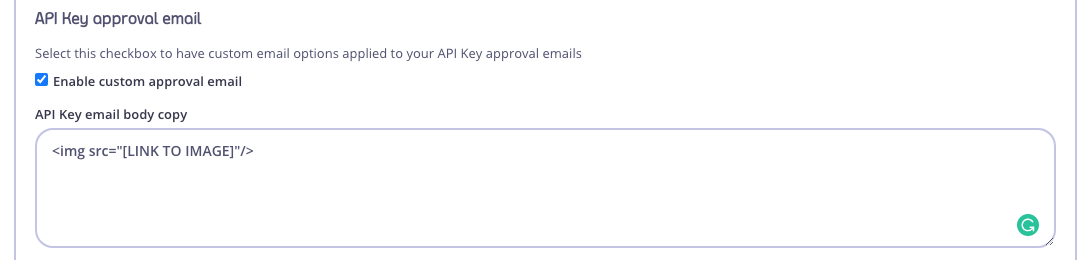
Note
The LINK TO IMAGE must be a publicly hosted resource.
In an Self-Managed installation you have full access to the HTML template, allowing you further customisation.
Portal Manager Email Settings

- Select Settings from your Dashboard > Portal Management
- From the Portal manager email address section, enter the email address of the person responsible for approving your developer API subscription requests. See Portal Key Requests for more details.